If you want to read all 6 patio building posts in order, here are the links to the posts, in chronological order:
Building a Patio - Part 1
Building a Patio - Part 2
Building a Patio - Part 3
Building a Patio - Part 4
Building a Patio - Part 5
Building a Patio - Part 6
Saturday, April 05, 2008
Building a Patio Posts
Building a Patio - Part 6
In my previous posts I've described the excavation process, laying the limestone and sand, placing the edging, and a bunch of missteps and lessons along the way. Now, after all the work it was finally time to lay the pavers.
The pavers we chose were a mix of 6"x6" and 6"x9" concrete pavers. This meant that we needed a pattern that would work, and look good, with the multiple sizes. We chose to go with a herringbone-type pattern with a soldier pattern along all edges of the patio.
Laying the first paver was a great feeling.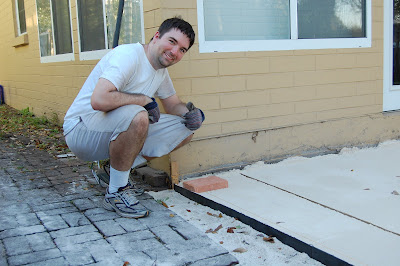
The line in the sand in the photo below was left behind when we pulled out the PVC pipe that we used to lay the 1 in. of sand. As I mentioned before, you don't have to fill that hole in all at once. Just fill it in as you go. It's much easier that way and it ensures that you're not walking on the sand.
We laid pavers down one complete edge of the patio and then started working inwards.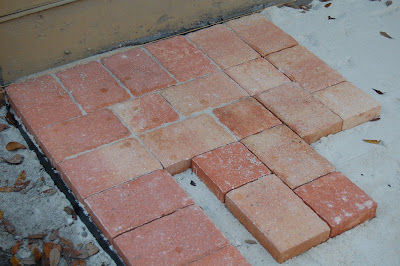
But...as I laid the pavers I really wanted them to be level. That turned into my biggest mistake of the project. I started checking each, individual paver with a torpedo level. This caused two issues:
- I ended up making things less level instead of more level by "fixing" each and every paver.
- I put my knees through hell squatting down 5-10 times for every paver.
TIP: If you have laid your crushed stone and sand correctly, just lay the pavers. Don't try to level every paver individually. It will take a LONG time and you'll end up actually making things unlevel.
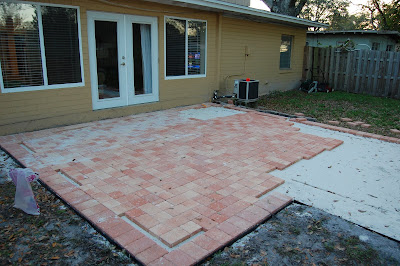
Within a few more hours, the patio was almost complete!
Following the completion of laying the pavers, we laid the remaining paver edging. Remember that previously I recommended only laying two sides of the edging to start. You can put the rest down at the end once you know exactly where the patio edges are.
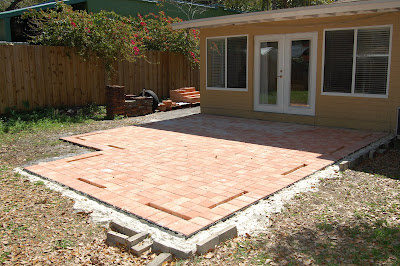
The last part of the project involved filling in the holes near the edge of the patio that you can see in the photo above. The way the pattern worked out there were some areas that required 3" pavers. Off to Home Depot I went and I rented a wet saw for four hours. The wet saw worked perfectly. But, I did learn something from the guy at Home Depot about how best to use the wet saw.
TIP: When using a wet saw, place the water pump in a separate bucket instead of putting the pump in the tray at the bottom of the saw. While this means that you will have to fill up the bucket and empty the saw water tray every few cuts since the water won't continuously circulate through the system, it will prevent the paver dust from flowing through, and possibly clogging up, the water pump. This was a great tip from the guy at Home Depot.
We finished the cuts and put the final pavers in place. Even though I had been putting mason sand into the cracks between the pavers throughout, now that the patio was complete, I could finally fill in the entire patio with sand.
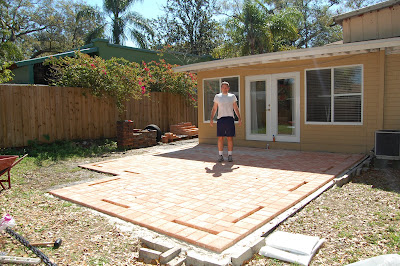
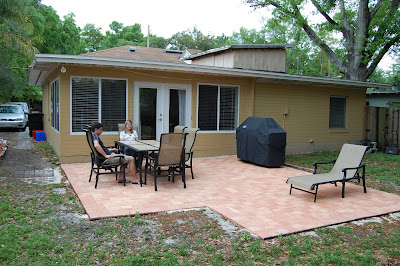
After about 50 hours of work by myself, my wife, and Eric, the patio was complete! It was a great learning experience and it adds so much to the back of the house.
Soon afterward (meaning within days) we got a new gas grill, which I will discuss in a future posting, and a new patio set. You just can't live in a place like Orlando and not have a place to go outside and enjoy the warmth and sunshine.
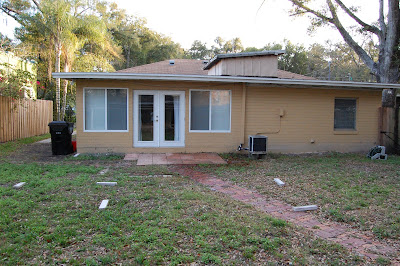
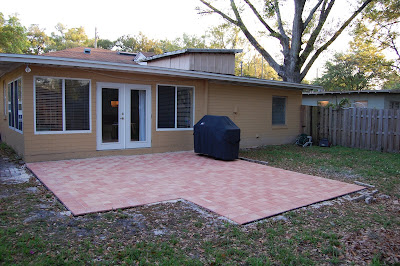
Hope you enjoyed the detailed process description and that if you ever decide to undertake building a patio project yourself someday that my descriptions, pictures, and tips help you along the way. Below are some final photos of the completed patio and the obligatory before/after photos.
BEFORE
AFTER

Friday, April 04, 2008
Deal of the Month! Well...Maybe Not
I got an email the other day from Coastal Contacts. I purchased contacts from them back in December of last year because they had the best price on my Acuvue 2 lenses. The subject of the email I received said, "Coastal Contacts Dropped the Price on Your Contact Lenses." I didn't need more contacts yet, but I decided to read the body of the email. In there, it said,
That got me to wondering. How much did I pay for my contacts in December? I went and I took a look at my order confirmation. Total price for each box of contacts I bought? $17? $18? Nope...We’ve just dropped the price on Acuvue 2 – get it as low as $14.74 per box! We have extra Acuvue 2 in stock, so we’re blowing out the inventory. Hurry, for a limited time you can save even more when you refill your contact lenses at Coastal Contacts!
$14.90 per box
I guess sending an email to people saying, "Hurry, Coastal Contacts is having a 1.07% sale on Acuvue 2 lenses!" just didn't sound as appealing as telling people that they are "blowing out the inventory."
Thanks for the great deal, Coastal Contacts.
Sunday, March 30, 2008
Building a Patio - Part 5
When I went to the Paver Systems paver yard to pick up the paver edging I needed, I ended up buying the wrong kind. I knew Paver Systems sold Snap Edge products and I wanted to buy the Paver Edge Restraint. The woman at the yard led me astray and I ended up with Sta-Right Landscape Edging. Fortunately, this landscape edging did not have the huge rings like the ones you find at Home Depot so we were able to make them work.
We started laying the landscape edging on top of the limestone and thought that we needed to lay the entire border of the edging before laying down the mason sand. We found out later that we were wrong.
TIP: When you lay down the landscape edging, you can either put the base of the edging under the sand and pavers or facing away from the sand and pavers. Both ways work just fine.
TIP: When you lay down the landscape edging on a square or rectangular patio, only lay down two edges to start in the shape of an "L". The two edges will allow you to lay the pavers out toward the other 2+ edges. You can lay the rest of the edging once all the pavers are laid. Otherwise, you'll probably end up moving the edging once you're done laying the pavers and doing the same job twice.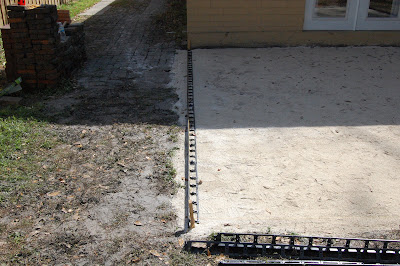
Once we finished laying the edging was down it was time to start on the mason sand. This step was surprisingly easy if you don't count needing to haul 50 bags of mason sand from the front driveway to the back yard. Due to the width of the patio we needed to screen the sand over one half of the patio at a time. We laid down the three 1 in. diameter PVC pipes along the limestone and started laying down the sand. Similar to the limestone, we put down a bit of sand, ran the 2x4 over it to screen it, and moved on to the next segment.
TIP: For those not familiar with the procedure, the reason you use the PVC pipe is because you know that you need an inch of sand. So by laying 1 in. PVC pipe down on the limestone and running a 2x4 over the sand and pipes until you see the tops of the pipes you know you have 1 in. of sand.
We moved the pipes as we went along and once we finished laying the sand across the entire area, we removed the pipes for good.
TIP: If you have a wide patio and cannot reach all of the pipe tunnels where there is no sand, don't worry. Just fill in the tunnels as you lay down the pavers. This keeps you from needing to walk on the screened sand.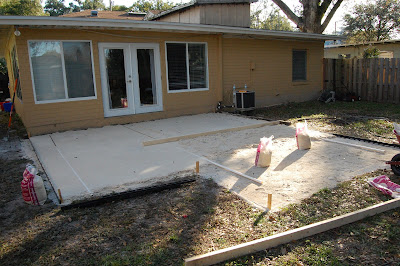
We finally had the patio to the point where it was time to lay down the pavers. In my next post, I'll discuss laying the pavers and the lessons I learned along the way.
Friday, March 28, 2008
Building a Patio - Part 4
We had gotten to the point where the dirt was excavated and compacted so it was time to start filling in the hole with other materials (not just more dirt from the dumpster - see previous post).
The first thing we laid down was landscape fabric. We used WeedBlock (not WeedBlock Pro) that says it guarantees no weeds for 10 years. This was, by far, the easiest part of the entire patio building process. Just roll out the fabric, hammer in fabric pins (bought separately) about ever 3-4 feet, and make sure you overlap the layers of fabric by a couple inches so that weeds don't grow between each row of fabric. Sure, the weeds, even without fabric would have to grow through 7 in. of limestone, sand, and pavers, but I have seen some pretty hardy weeds and any relatively cheap things I can do to make maintenance of the patio easier in the long run seems like a wise idea to me.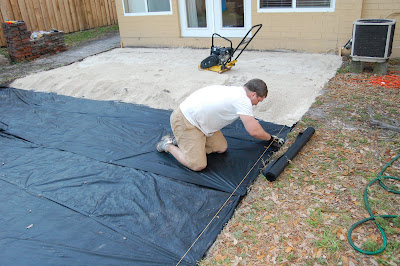
Before I move on, I will digress for a moment and talk about leveling the dirt.
We spent a good bit of time trying to level the dirt to a common depth across the excavated area. After laying down the limestone, though, we figured out that we didn't really need to spend so much time trying to level the dirt. Obviously, you don't want to have huge humps or dips in the dirt, but since we put limestone over the dirt anyway, and leveled that, the limestone filled in any unlevel spots in the dirt.
TIP: Just get the dirt excavated to where it's at just about the right depth and the slope is accurate. Once you have that done, run the compactor over it, and move on.
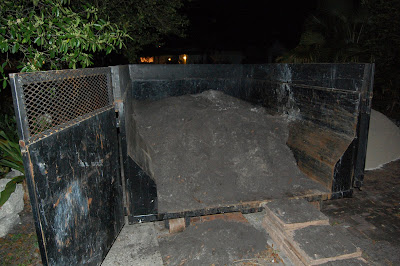
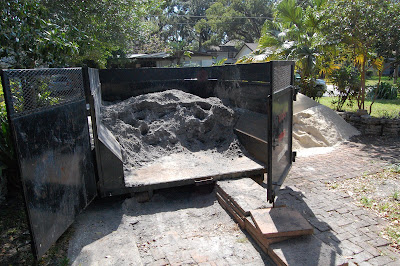
At this point it was time to start spreading the limestone. This is another long, painful phase if the limestone is far from the excavated spot. I had 8 tons of limestone delivered (about 1 ton more than I needed just to be sure). Wheelbarrow-by-wheelbarrow we brought the limestone back to the hole and dumped it in. We'd fill a bit of the hole, run the compactor over that area, and move to the next part of the hole.
TIP: Get a little more material than you need just to be on the safe side. For example, I had to get a stone yard to deliver the crushed limestone. They only delivered a minimum of 6 tons of stone. So if I had not ordered enough limestone they would not have delivered an additional 1-2 tons. I would have had to rent a truck and pick up the limestone myself at a significant extra cost.
TIP: You can make the compacting process go a little smoother with a hand compactor. The gasoline-powered compactor does a great job everywhere except the edges. A hand compactor comes in handy when compacting corners and edges.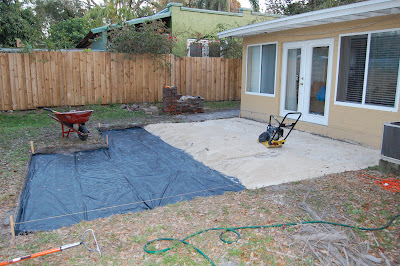
By the end of the day, we had finished filling in the hole with limestone and we called it a night.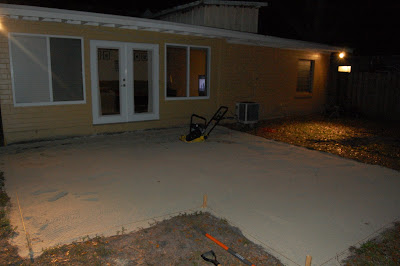
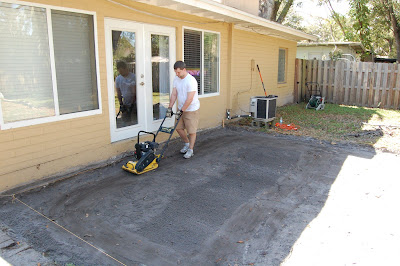
The next morning we compacted the entire area. After compacting the area, we readjusted the mason lines attached to the wooden stakes and made sure they were all at accurate levels. With the lines at the correct level we went over the entire area and screened the limestone using one of the 2x4s. This turned out to be an essential step. As we went along with the 2x4, about 1 ft. at a time, we checked the level of the limestone against the string on the border. We knew we had 1 in. of sand still to lay followed by 1.75 in. of pavers so we made sure the limestone was level and at a depth of 2.75 in.
TIP: Make sure your limestone is level and at the right depth before you start laying your paver edging and mason sand. It doesn't have to be perfect, but it will help ensure that when you lay the sand and pavers, everything ends up level.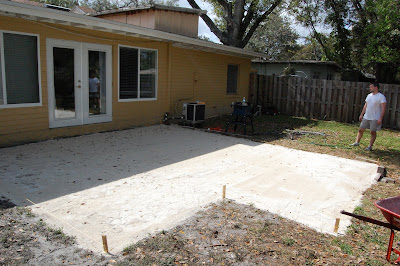
We had finished the laying down the limestone and it was time to move on to laying the patio edging and mason sand. In my next post, I'll describe how we handled those steps.
Thursday, March 27, 2008
Building a Patio - Part 3
OK, back to the patio building after my slight digression to discuss car loans...
Fortunately for me, my friend, Eric, volunteered to come out from Dallas to Orlando for the weekend to assist with the patio building. Why, I will never know. It is not a fun project.
Before Eric made it into town, the wife and I staked the patio area using the wooden stakes and mason string. I followed some tips I read online and planned for a 1 in. drop every 8 ft. for drainage. Since the patio was 20 ft. long this translated to a 2 1/2 in. slope.
TIP: A 1 in. slope every 8 ft. turned out to be just a bit much. You could probably get away with a 1 in. drop every 10-12 ft. and be just fine.
When Eric came into town we began task #1, excavation. As I mentioned in a previous post I rented a dumpster to have somewhere to put all the dirt. How much dirt did we need to excavate? I decided to use a 4 in. base of crushed limestone (that seemed plenty - 6 in. seemed a bit excessive) On top of that we needed 1 in. of mason sand. To top it all off we had 1.75 in thick pavers. Add it all up and we needed to excavate about 7 in. of dirt.
So we started digging. And digging. And digging.

And as we dug we filled up the dumpster.
TIP: When filling a dumpster with material like dirt, make sure you check with the dumpster rental company about how full you can make the dumpster. Dirt and loose materials pack densely and are quite heavy. We were told that we could only fill the dumpster halfway full to ensure they could haul it away.
The next morning we finished the excavation and thought we were done. But then...We looked along the house and noticed that there was some concrete as part of the house foundation that stuck out a bit from the house. If we kept the pavers at the same, planned height we would have had issues with these pieces of concrete. We could have tried to break off the concrete but that could have damaged the foundation. So we decided to raise the height of the patio so that the pavers would be above the height of the concrete. And, as you can guess, that meant that we had now dug out too much dirt. It's hard to express the pain that we felt when we realized that we now needed to go back into the dumpster, take OUT dirt, and put it BACK INTO the hole. Make sure you plan your patio height adequately before excavating so that you don't take out too much dirt.
So after spending another couple hours bringing dirt back into the hole we were finished with excavating. At this point we rented a small plate compactor from Home Depot and compacted the dirt. It's always a good idea to start with a firm, level base. The small plate compactor worked just fine; we didn't need the large one for the 330 sq. ft. Plus, it fit into an SUV whereas the larger one would not have.
In my next post, I'll describe the process that went into laying the landscape fabric and crushed limestone.
Sunday, March 23, 2008
Paying Off My Car Early - A Good Idea?
With the interest rate on my FNBO Direct Savings account falling like a rock (from 6% to 3.25% in six months) thanks to the Federal Reserve, I started thinking about other debt that I have. Fortunately, I'm a relatively debt free person. The wife and I have our mortgage, of course. We're not going to pay that off any time soon. I'm credit card and college debt free, so no worries there.
The one debt that I did have was my car. I was currently paying $366.57 each month to Capital One for my tidy, little 2006 Ford Focus. With 16 payments left, I was on schedule to pay another $5685.12 before I would officially own it. And so, I wondered, is it time for me to pay off the car?
Now, before I describe the process I went through to determine whether or not I should pay off my car loan, I want to point out that I agree with financial advisors that recommend that people should make sure they have a 3-6 month emergency fund before paying off large debts (credit card debts with huge interest rates possibly excluded). Even if I chose to pay off my car, I would still have a reasonable emergency fund, so I moved forward with my calculations.
To figure out whether or not paying off my car made a good idea, I did three calculations.
- Capital One Interest Saved - By paying off my car loan early, I would save a certain amount of interest that I would otherwise pay to Capital One. To figure out those savings, I went to BankRate.com and opened up their auto loan calculator. I plugged in the remaining loan amount ($5626.08), the number of months (16), and my interest rate (5.89%). The calculation returned that I would pay Capital One a total of $237.59 in interest.
- Savings Account Interest Lost - By taking the money out of my savings account to pay for the loan, that is interest that I will not be accruing over the next 16 months. To figure out the interest lost I went to the compound interest calculator on About.com, plugged in the remaining loan amount ($5626), the interest rate (2.7% - I'll explain this below), and the number of years (16 months = 1.33 years). This calculation showed that I would lose out on $202.92 in interest.
Why did I use 2.7% as my interest rate instead of the 3.25% that my bank posts? Because I have to pay taxes on that interest rate, which lowers my effective interest rate. Unlike mortgage interest, I cannot deduct my auto loan interest so I didn't change the interest rate in the first calculation. - Savings Account Interest Accrued - If I paid off my car, I would have $366.57 a month that would not be going to Capital One. I could take this money and spend it each month on fine wine and Nintendo Wii games, or, put it back into my savings account, thereby slowly replenishing what I took out to pay off the auto loan. Putting the money back into savings would also allow me to recapture some of the lost accrued interest. To determine the amount of interest that would accrue, I went to the savings calculator on calculatorweb.com. I plugged in the initial amount ($0), monthly savings ($366), the interest rate (2.7%), and the term of investment (1.33 years). This calculation told me that I would accrue $112.71 in interest during this time.
Taking these three numbers I could figure out what, if any, money I would save by paying off my car. I took calculation 1, added it to calculation 3, and subtracted calculation 2.
$237.59 + $112.71 - $202.92 = $147.38 saved!
That information gave me all I needed to know. I wrote out the check to Capital One, updated my weekly deduction to increase the amount going into my savings account, and paid off my car!
Here are the three links I used for my calculations, in case you want to check out your own savings:
- Bankrate.com - http://bankrate.com/brm/auto-loan-calculator.asp
- About.com - http://math.about.com/library/blcompoundinterest.htm
- Calculatorweb.com - http://www.calculatorweb.com/calculators/savingscalc.shtml
As always, let me know if you have any thoughts about my logic and/or calculations.
Thursday, March 20, 2008
Building a Patio - Part 2
In my last post, I wrote about the main building materials I purchased for my new paver patio. In addition to the those building materials I also needed to pick up some tools and smaller materials, including:
- Spade and flat shovel
- Bow rake (not a leaf rake, make sure the tines are solid and not flexible)
- Large level and torpedo level
- Mason string
- 18 inch wooden stakes
- Wheelbarrow
- Tape measure
Once I had all the materials, it was time to figure out the size and layout of the patio. As you can see in the photo below, the back yard held a lot of "promise."
The wife and I decided that we wanted to go with an L-shaped patio with the long part of the L along the house. We laid out some spare concrete bricks in the yard to approximate the layout and figure out the size. The final dimensions of the patio were 18ft. long against the house and 20ft. deep away from the house. We cut out a 6ft. x 5ft. piece to turn the patio into the L-shape that we wanted. This left us with a patio with a total of 330 sq. ft. That may seem like a lot but most of the research I read before building the patio warned against underestimating the size of the patio. Knowing that, we decided to go with the safe route and error on the large, instead of small size. You can see the bricks that we laid out in the photo below.

The wife and I removed the old pavers and the remainder of the brick walkway that had weeds growing through it long before we bought the house. Whoever said that demo is fun, well, was wrong. One of the issues is figuring out where to put all of the old stuff. It's one of those things where the pavers and bricks can't just be thrown into the trash can and put out to the curb but there isn't enough there to warrant renting a dumpster. We still may put some of the better bricks up on Craigslist or figure out something to do with them ourselves.
Now that we have the materials and have cleared out the old pavers and bricks, it is time to build the patio. In my next post, I'll discuss the first phase of patio building, excavation.
Subscribe to:
Comments (Atom)